Update topography
The topography is a 3D spatial data file that represents the current surface of the mine.
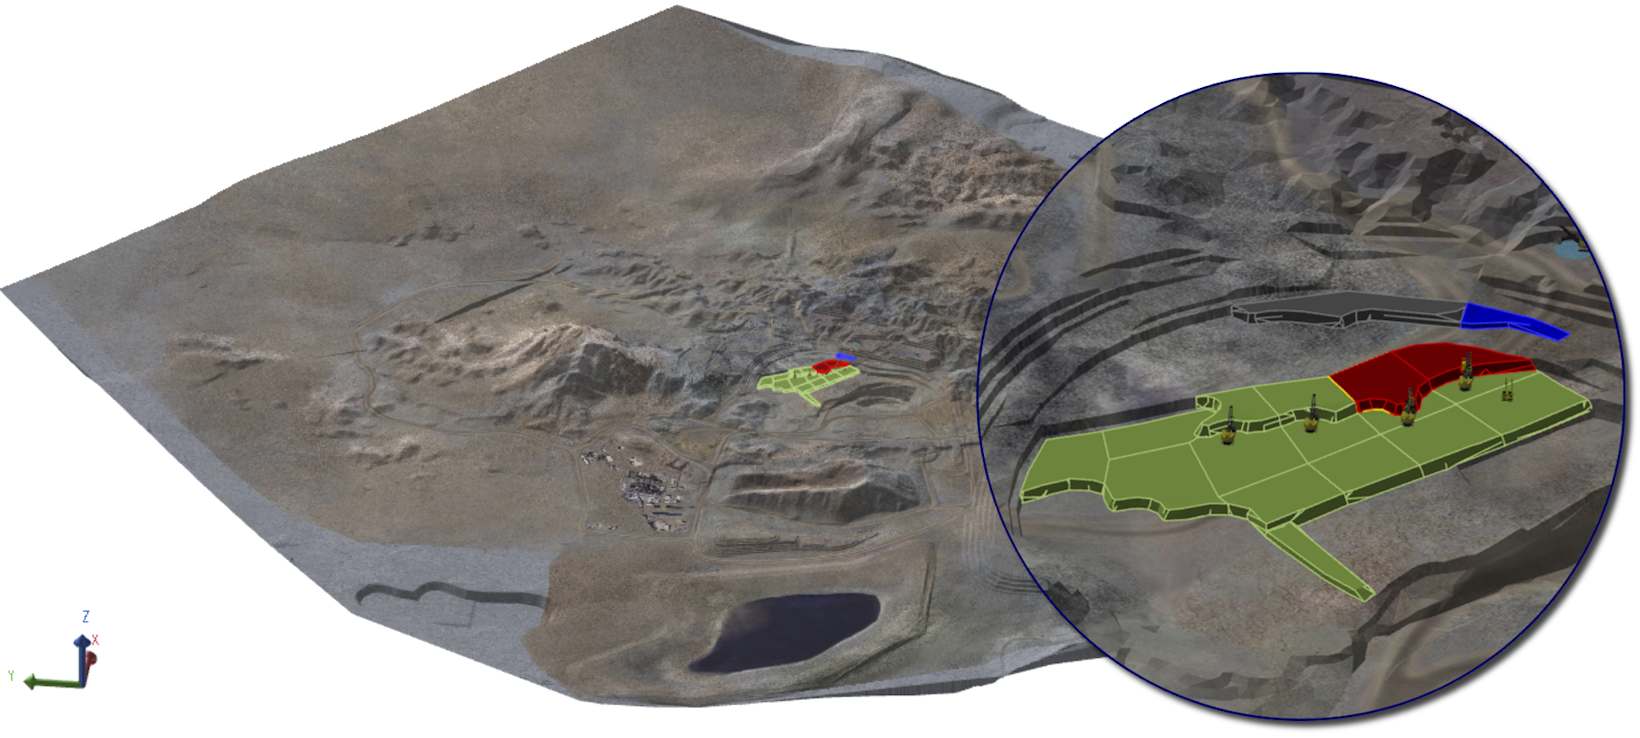
A site’s topography and activity areas
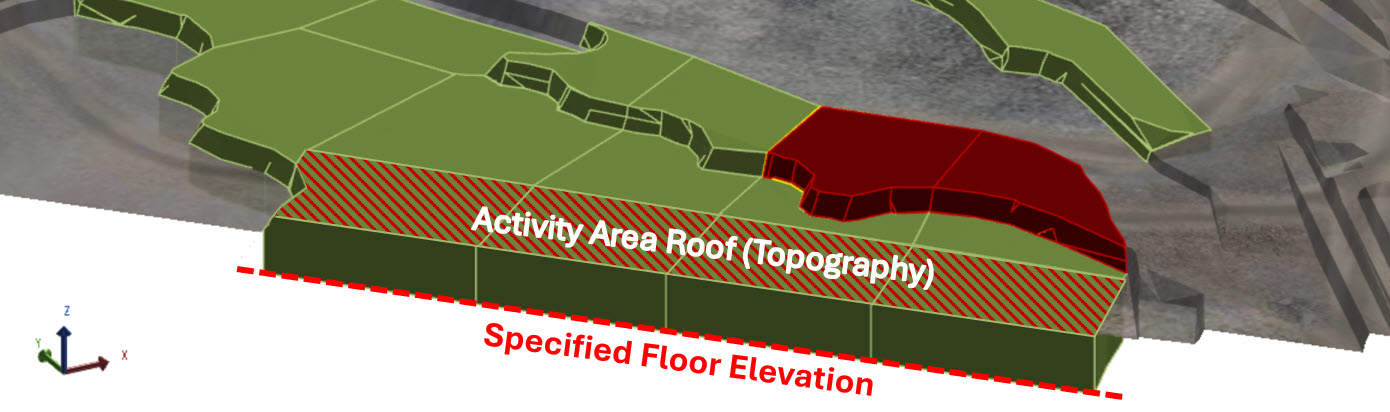
Digging always occurs from the topography, as an activity area’s geometry always projects from the topography to a specified elevation level below. As such, the topography defines the elevation and the shape of the roof of activity areas (in other words, the starting level for mining portions of the deposit).
If the topography is out of date, your schedule may:
-
Include areas that have already been mined.
-
Overstate remaining reserves and grades.
-
Misalign with actual face positions, leading to operational inefficiencies.
You update the topography by importing the newest surface which replaces the existing one.
A site can have multiple surfaces.
When to update
You should update the topography when you have a new surveyed surface that reflects the current mine floor. This frequency should be daily or weekly, depending on the level of accuracy you need day-to-day. The longer you don’t update it, the less the XECUTE schedule reflects reality.
The topography is mandatory
Each site must have a topography. Without it, there is no reference point for designing activity areas.
Where to configure the topography
To configure a site’s topography, go to
Config > Site Management > Edit Site ![]() > Topographies, Aerials and Pit Limits
> Topographies, Aerials and Pit Limits ![]() .
.
What happens when you update the topography
When you import a new topography, XECUTE replaces the existing surface with the updated one. This change affects both the visualisation and the underlying calculations in your schedule:
-
Activity areas adjust automatically
Any unmined activity areas that intersect the new surface are trimmed to match the updated ground level. Portions above the new topography are removed, ensuring the schedule reflects the actual mine face. -
Future designs use the new surface
Any new activity areas you create will start from the updated topography, giving you an accurate reference for planning. -
Reserve calculations stay accurate
Because the topography defines the roof of activity areas, updating it ensures that remaining tonnes and grades are recalculated correctly. -
Visualisation updates immediately
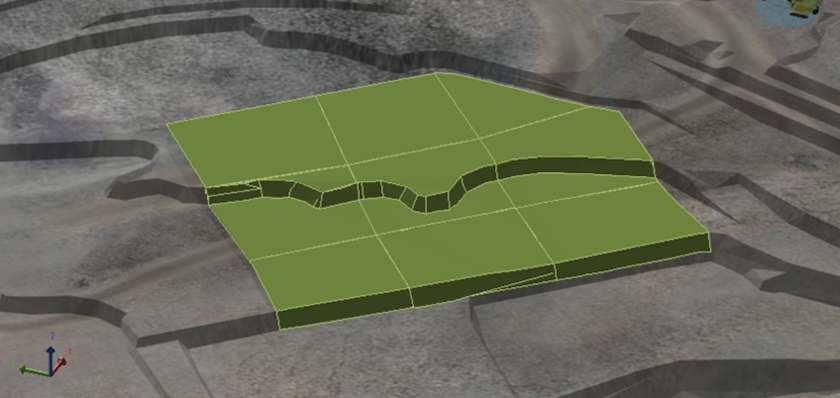
The 3D scene in Client and Config reflects the new surface, helping you validate alignment and check for inconsistencies.

Before and after updating the topography that intersects an unmined activity area. The software automatically updates the activity area, removing portions of it above the new surface.
Update the latest topography
To update the latest topography
1. Go to Config > Site Edit![]() > Topographies, Aerials and Pit Limits
> Topographies, Aerials and Pit Limits![]() >
>
Topography Visualisation File(s).
2. Click Remove ![]() on any existing topography that will be replaced.
on any existing topography that will be replaced.
3. Click Add ![]() to define a topography profile.
to define a topography profile.
4. Within the new row, click Wireframe Topography File ![]() . Navigate to and select the new topography file.
. Navigate to and select the new topography file.
5. Repeat for any additional surfaces, then click Save ![]() .
.
6. Confirm the Status shows Completed for all topographies.
After you save a topography surface, you must select a data source to store the object.
You can update topography while the site is running. This is the simplest way to refresh face positions without rebuilding the schedule.
Topography wireframe
You specifically import a topography wireframe. This is a 3D solid, representing the current shape of the mine’s surface.
The wireframe is purely geometric. It does not include textures or imagery by default. Those are optional and added separately as an aerial image.
How to get the topography
Topography files are typically generated by your survey team using:
-
Drone or aerial surveys (photogrammetry or LiDAR).
-
Ground-based survey instruments (e.g., total stations, laser scanners).
-
Exported from mine design or survey software such as Vulcan, Surpac, Minex, or similar.
Supported formats include:
-
Triangulated surfaces: *.dxf, *.dtm, *.tr5, .*rpmx, *.stl, *.glb
-
Grids: *.grd, *.map, *.dat
-
Other: Well Known Text (*.wkt), GLTF (*.gltf)
Aerial image (optional)
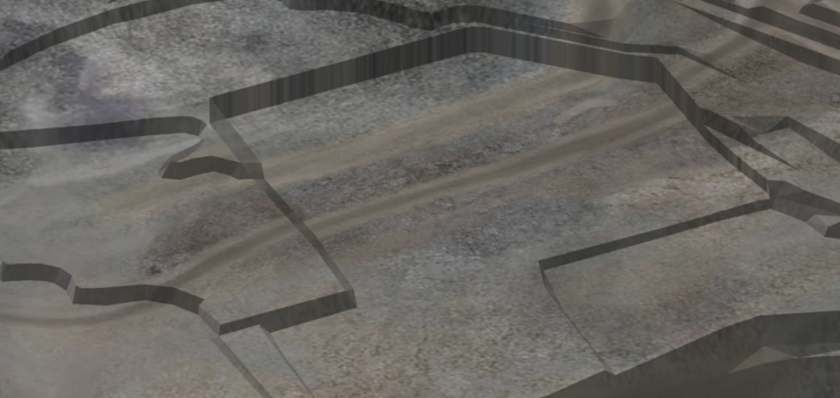
Along with the wireframe, you can import an aerial image, which is a georeferenced photo of the mine surface. This image is draped over the topography to improve visualisation in the 3D scene. It provides context for planners, making it easier to interpret the scene and validate alignment.
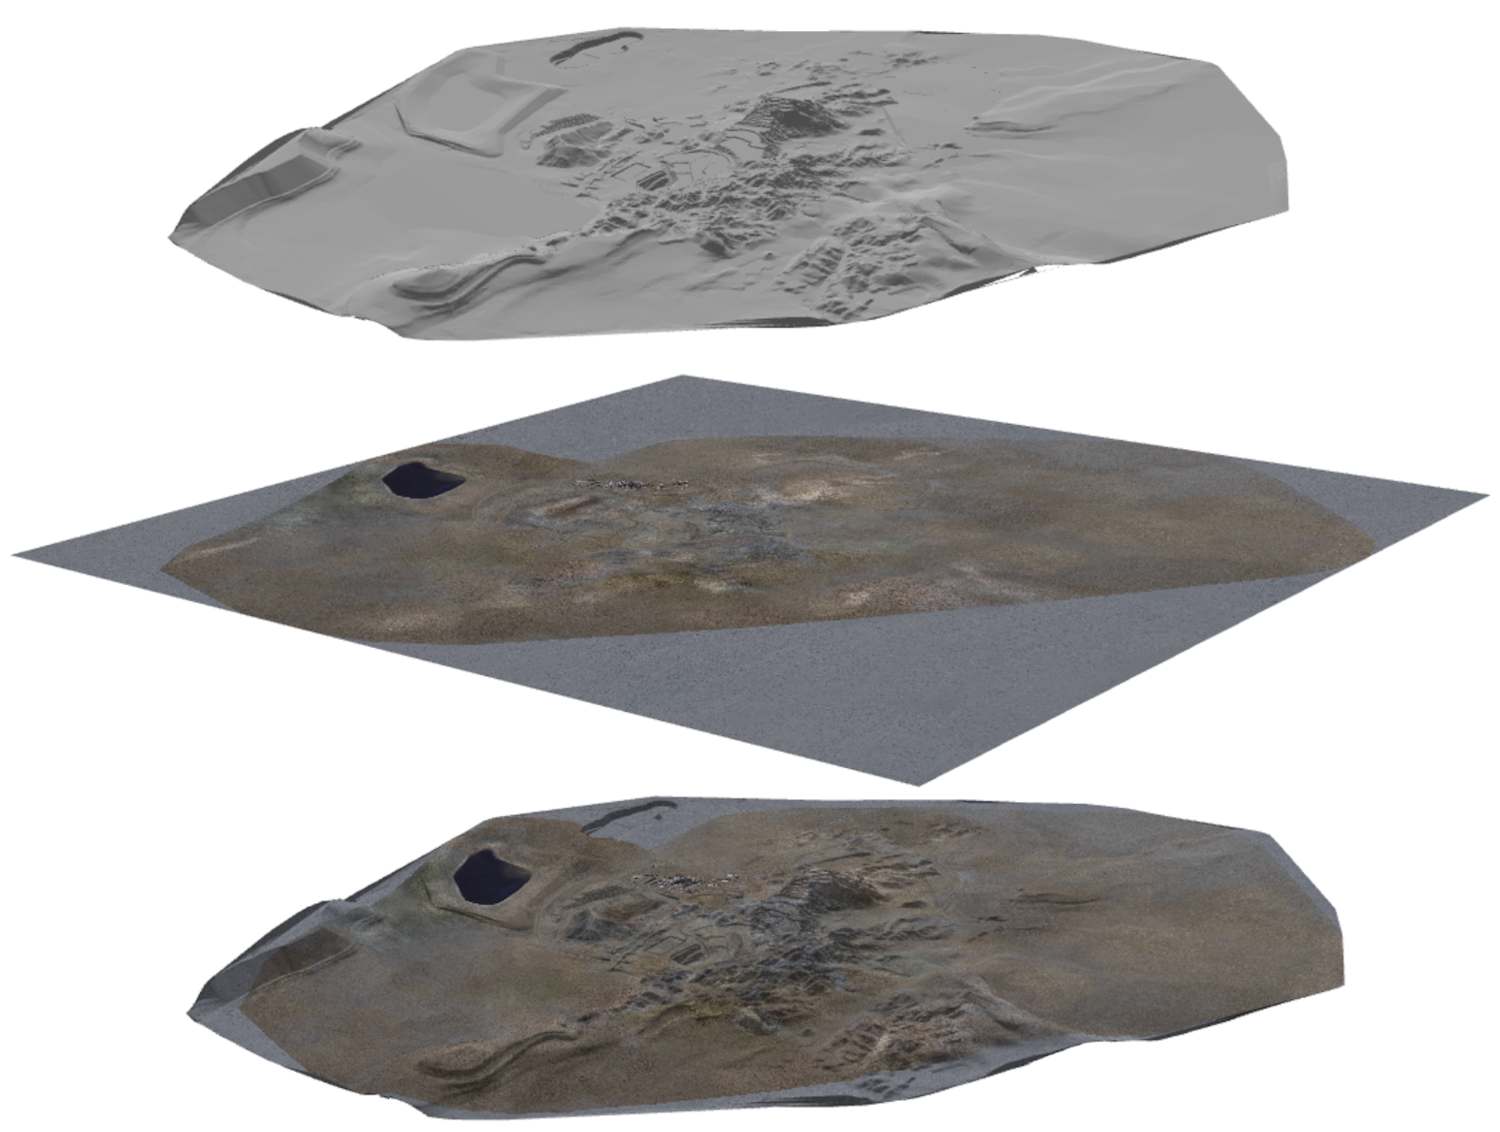
The aerial image (middle) is draped onto the topography (below)
Supported formats: *.jpg, *.jpeg, *.png, *.bmp, *.gif, *.tiff, *.ecw
World files (*.[extension]w) are supported for all formats except *.ecw. If a world file is present, XECUTE automatically applies the correct spatial alignment.
Import an aerial
-
Go to Config > Edit Site
 > Topographies, Aerials and Pit Limits
  .
. -
Next to an imported topography, click Aerial Image File
 .
. -
Use the File Explorer to navigate to and select the image file.
-
Click Save.
Edit image alignment
After you select an image, you can adjust its alignment around the surface. To open the alignment window, on the topography file row, click Align the topography with the aerial image ![]() .
.
Two windows are presented. On each window, three corresponding points are shown. Each point represents a corner of the image. The points map the corners of the image onto the surface. You can change the location of the points.
-
The left window previews the surface. You can switch on Preview Image to transpose the image on the surface, providing a clearer illustration of the alignment. The points indicate where the (delineated area of the) image is mapped onto the surface. You can drag the points to change the mapping location.
-
The right window previews the image itself. The points delineate the area of the image that will be mapped onto the surface. You can drag the points to change this area.
Click OK to drape the aligned image onto the surface.
Validate the newest topography
After importing a new topography, it’s important to confirm that it’s positioned and scaled correctly before continuing with scheduling.
How to validate
-
Visualise in Config or Client
-
Go to Config > Site Management > Visualise the Site. On the ribbon, toggle the display of the object to view it.
-
Open Client and toggle the object's visibility on the the Scene Manager tree.
-
-
Compare the topography against other site elements such as:
-
Verify coordinates.
-
Hover over the object in the 3D scene and check the cursor coordinates in the bottom-right corner.
-
Ensure the values match expected site coordinates.
-
-
Look for misalignment
-
Check that the object aligns with known reference points (e.g., pit limits, points on the topography, survey markers).
-
If the object appears shifted, rotated, or scaled incorrectly, correct it in your CAD or survey software (e.g., Vulcan, Surpac, or MinePlanner’s Spatial Data Manager) and re-import.
-
For existing activity areas, check whether the updated surface has affected their designs.
Generate new topography from XECUTE
If you don’t have an updated survey surface, you can create a stage plan in XECUTE. A stage plan is a generated surface that represents the mine at a specific point in time during the schedule.
When to use this method:
-
When survey data isn’t available or is delayed.
-
To create a quick reference surface for planning future activity areas.
When generating a stage plan, you select a date within the schedule (for example, the end of the current horizon). XECUTE generates a surface that reflects all mining completed up to that point. The software cuts mined-out areas from the original topography and outputs the result as a new file.
This method is less accurate than a surveyed topography because it’s based on planned progress, not actual measurements. Use it as a temporary solution until real survey data is available.
For more information and steps to generate a stage plan, refer to Export stage plans.
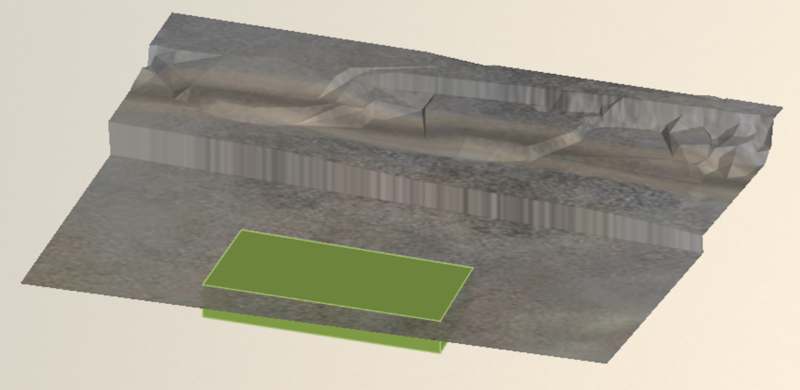
Unmined activity areas and a topography
The new topography, which accounts for the mined activity areas. The shape of the mined activity areas were cut int the topography. It was exported as a stage plan then reimported.
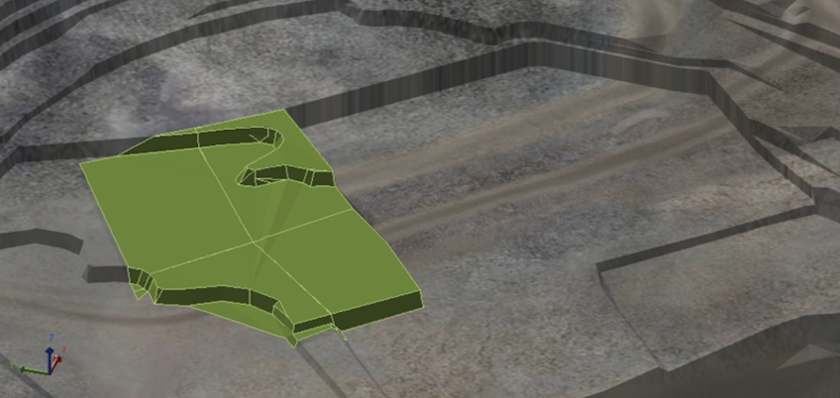
Drawing new activity areas on the new topography
Options
You configure a site’s topography surfaces using the table options.
|
Option |
Description |
|---|---|
|
|
Appends a row to the table, used for adding a topography surface to the site. |
|
|
Removes the selected table row (topography surface). |
|
|
Saves your changes to the site’s topography surfaces. |
|
|
Import a topography surface or aerial. |
|
|
Selects a level of simplification, which controls the degree of reducing the number of triangles. This option is useful for large spatial data files with an unnecessary amount of detail. Simplified files have a smaller size and can improve processing performance. |
|
|
Assigns the topography to a spatial domain. For more information, refer to Spatial domains. |